I built my first custom keyboard (Katana60) back at the beginning of this year and the second one (Corne) a few months ago, but I am already designing another one. Apart from the fun I have as I build and customize those keyboards, it is about looking for a more effective keyboard layout for my daily work. This article sums up my journey which leads to the decision to design own keyboard.
This article is Part 1 in a 7-Part Series.
- Part 1 -In search of the best custom keyboard layout
- Part 2 -Let me introduce you SofleKeyboard - a split keyboard based on Lily58 and Crkbd
- Part 3 -SofleKeyboard build log/guide
- Part 4 -Sofle Keyboard evolution: slow and not really steady
- Part 5 -Another year of Sofle keyboard
- Part 6 -Stáňa AKA Sofle Unsplit - a monoblock split keyboard
- Part 7 -Stáňa - a monoblock split keyboard, part 2
Motivation
I work as a software developer so typing is a very important part of my daily work. But not just typing. There are plenty of other tasks I need to do quickly - navigating through the source code, editing, using various tools available in editor or IDE. The most effective way of achieving such a task is to use keyboard shortcuts.
A long time before I started building custom keyboards, I was already trying to find ways how to be more effective when working with my computer and more specifically with a keyboard.
- I have been using the Colemak layout for quite some time.
- I invested the time necessary to learn and practice touch-typing.
- And I had been a long-time Vim addict and I had to use Vim plug-in in every editor I had been using. That’s no longer true, but it did affect how I use a keyboard.
Vim
I am not going to dive into reasons why I no longer use Vim, but I am going to mention what I like about vim.
Vim allows you to use keys that are easy to reach to do the most useful stuff - navigation through the text and basic manipulation are done by letter keys you have just under your fingers, without any modifiers. This is achieved by using multiple modes. The default mode (called command mode) is for movement and manipulation and you need to switch to insert mode in which you type. This feels weird at the beginning but it is very addictive once you get used to it.
You can just keep your hands on the keyboard and most of the time even in the basic position and achieve a lot. No mouse, not much moving around the keyboard. One example: instead of the arrow keys, four letters under the right hand are used: h,j,k,l.
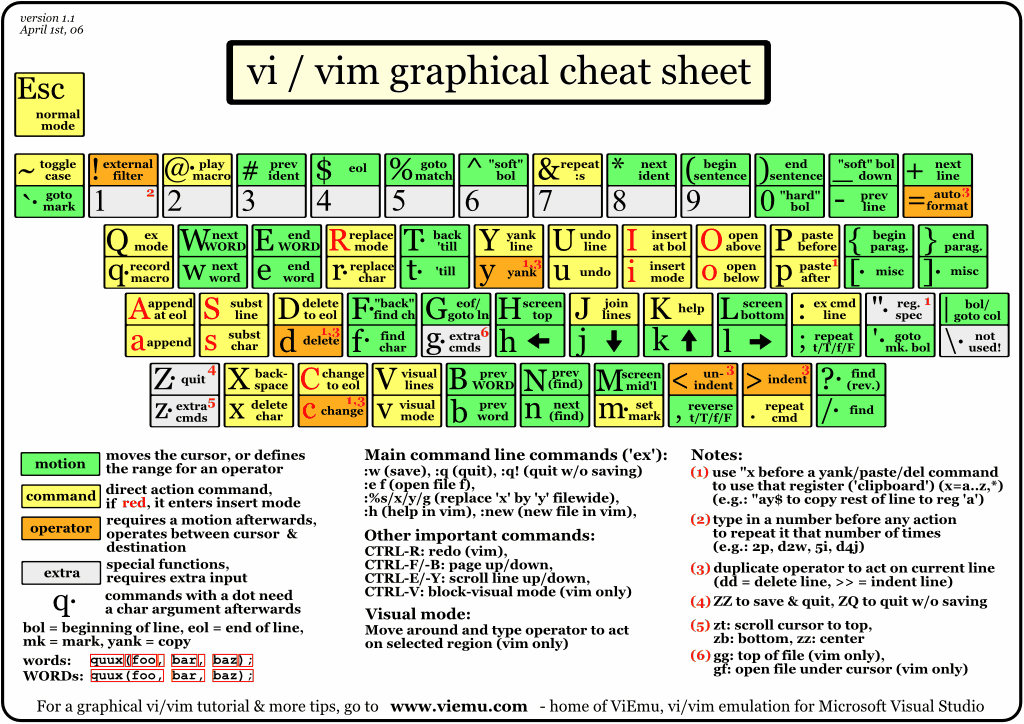
In other editors, you need to either move your hand to a special key (arrows, Home, End, etc.) or use some shortcut which involves one or more modifiers (Shift, Alt, Ctrl, or Cmd).
Keyboard size
The above has one important consequence - you don’t need a full-feature keyboard. It’s a waste of time to move your hand away from the basic position. So you stop using num-pad, home/end/page up/down cluster and arrows. So it makes sense to have a smaller keyboard, doesn’t it?
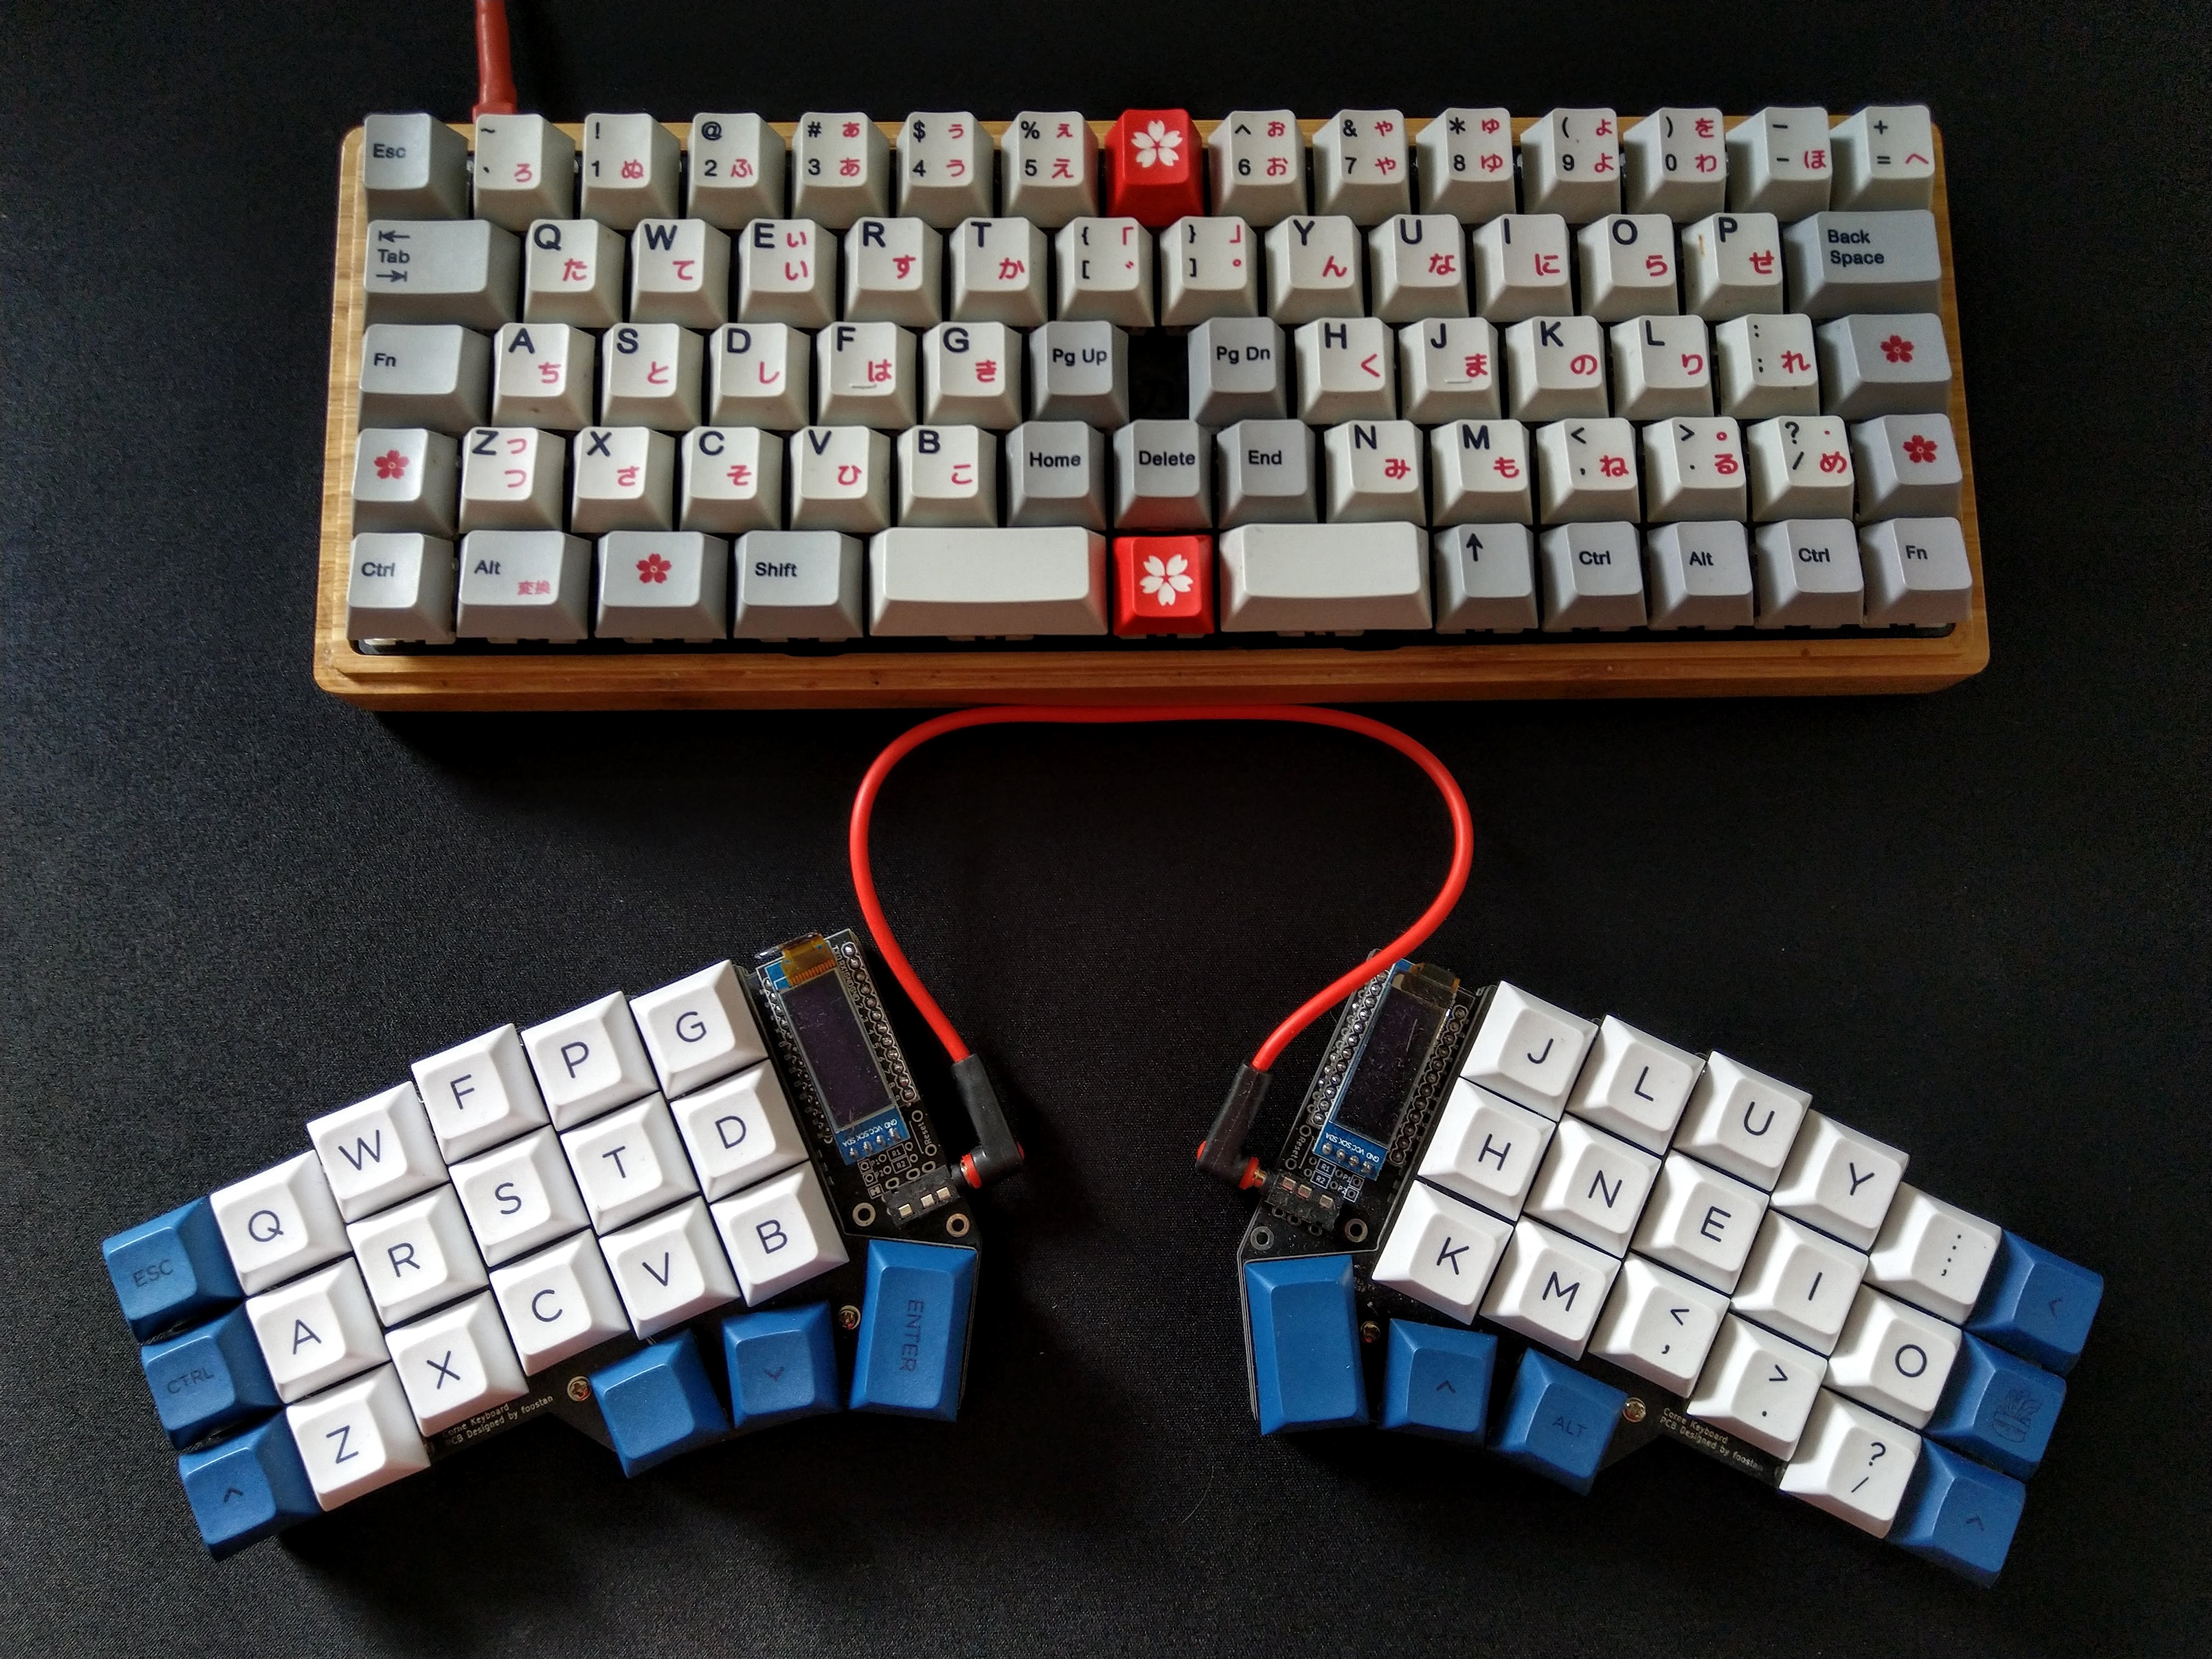
In the world of keyboards, a per-cent notation is used to classify keyboards according to the full keyboard. A 100% keyboard is the old good big one with everything. The katana60 I use right now is a 60% keyboard. Corne, my second keyboard, is only 40% which is minimalistic.
What are my expectations?
Let’s sum up my requirements from my keyboard setup.
- Colemak layout for basic typing1.
- Have an easy way how to move around the text: arrows,
home,end, next/previous word,page up,page down. Have the ability to hold shift while using those to select text. - Have easy access to special characters - all the brackets, semicolons, dollar signs, and others are important when writing code.
- An easy and effective way of using shortcuts. I need to be able to combine letters with one or two modifiers and other keys (symbols,
F-keys) with one modifier. There is one important detail in this regard: I need modifiers to be mirrored on both sides of the keyboard because I hold them with the opposite hand to the one which presses the main key. For example, if for shortcutCtrl+Shift+aI would pressCtrlandShiftwith the right hand becauseAis on the left side of the keyboard.
Layers
What is a layer when we talk about keyboard layouts? It’s an alternative mapping for keys on the keyboard which can be activated either temporarily, while you hold a key, or toggled permanently when you tap a key. Imagine how FN key works on laptops: when you hold the key some other keys have a different function. Another example is the num-lock key on a keyboard which toggles the behavior of keys in the Numpad cluster.
Usage of layers is very common in the custom keyboard community and firmware like QMK support layers out of the box. But you don’t need a programmable keyboard to have layers. There’s a way how to make them work on all operating systems.
There’s one very detailed and very important post about layers on the Colemak forum. This post is written by DreymarR and he explains there the concept of a layer with some handy extensions. The post influenced the original layout of the Katana60 keyboard quite bit and since my layout is heavily based on that one it affected mine too.
Katana60
I have already described my layout for my Katana60 keyboard. But I am going to revisit the important details here too.
Katana60 has 4 layers and my configuration is very close to the default one.
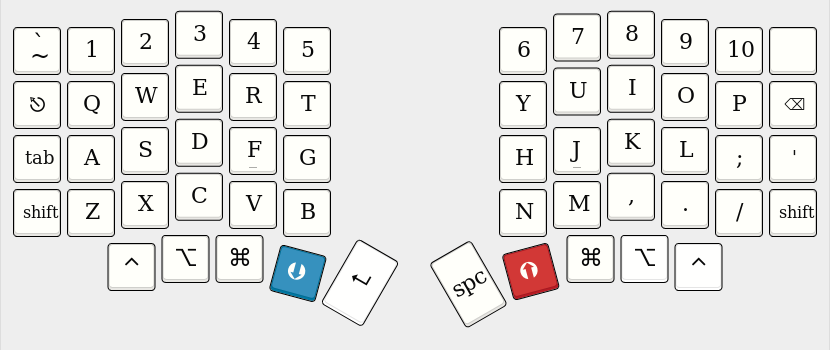
- The default layer - contains all the basic keys you know. There are also arrow keys in the bottom row. The first three arrows act as modifiers when held so my need to have modifiers mirrored on both sides is fulfilled. Notice that there are no
F1-F12keys because there are not enough rows for them. - Symbol/FN layer - activated by holding one of
FNkeys in both bottom corners or by holding backspace in the middle. This layer is green in the animation below. I have never used the FN keys in corners, only the middle one (which acts as abackspacewhen taped but activates the layer when held). This layer is the only way how to accessF1-F12keys. It also moves numbers and symbols closer to the home position and adds easy access to other symbols. Very useful when programming. - Extend layer - activated by holding a dedicated key that replaces caps-lock. This is a very important layer for movement and text editing. Blue one on the animation. I have quickly become addicted to this layer and cannot imagine not having it available.
- Num-lock layer - this one contains mainly Numpad and is toggled by pressing a dedicated num-lock key. Red color on the animation. The important detail here is that it is activated permanently when you press the key and deactivated when you press it again. I rarely used this one. The red one on the animation.
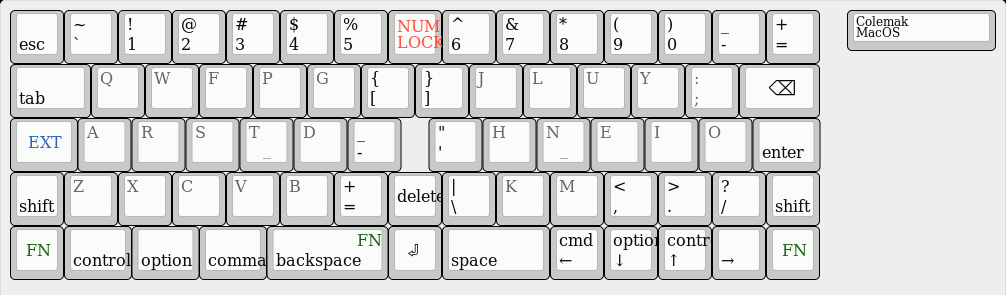
The whole layout without any animation can be viewed in the keyboard layout editor.
Moving to split
I wanted to build a split keyboard from the beginning. I chose Katana60 as the first build because it was a step in that direction and seemed to be a good place to begin experimenting with custom keyboards.
Recently I build a CRKBD (Corne keyboard). I admit the decision to build the keyboard was a little bit impulsive. I love how it looks and as soon as I learned I could have PCBs and parts for a sandwich case manufactured very cheaply I was not able to resist and placed the manufacture order. But once I built it and tried using it I quickly realized it is too minimalistic for me.
Let’s look at the default layout.
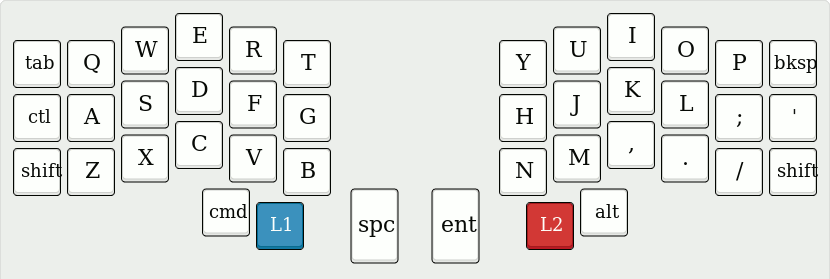
The default layout is not that interesting. Let’s focus our attention on the keys that we have available.
We sacrificed the number row (the top one) on this keyboard. We have also only 3 keys in outer columns and 3 keys in the bottom row. There are also some additional keys in the middle cluster on Katana60, but since I was barely using them I’ll ignore them.
And we need to fit somewhere:
Ctrl,Alt,Cmd,ShiftTabEnterSpaceBackspaceEsc- 2 keys for switching to other layers
That is 11 keys so it is possible to fit them into both outer columns and bottom rows (12 available keys in total).
But such a solution creates problems:
- I cannot have modifiers on both sides in a symmetric way. This would require 4 more keys.
- I would also like to keep
Shiftkeys in the normal position and the remaining modifiers in the bottom row. But I would also like to haveSpaceandEnterunder my thumbs in the bottom row. That is at least 4 keys in the bottom row on each side. If we add layer switching keys we would need 5.
What would be possible workarounds?
-
Join layer switching keys with
SpaceandEnter. Each key would act like a normal key when tapped, and select another layer when held. QMK firmware supports such tricks. I have tried that, but it has its problems. Mainly it creates a lag when typing. Even though it is just a few hundreds of milliseconds, but it is noticeable and very annoying. I was also having problems with errors where I wanted modifier but got the character. Those were most likely caused by my clumsy finger, but they were too common and annoying. And as the last and the biggest issue: this gives me only 2 more keys, that’s still not enough. -
Use keys in the bottom letter row as multifunctional. For example
Z-Ctrl,X-Alt,C-Cmdand the same for,,.and/on the other side. Using the same trick when tapping the key sends a character and holding the key sends the modifier. This has similar problems as above, only worse.
I have also found it is difficult to fit all the keys I wanted in the remaining layers. I had to use the 4th layer (activated by holding both layer-switching keys at the same time) for F1-F12 keys. But such an arrangement didn’t work because I need to have the ability to use at least one modifier with any F key and that is very difficult when I already have to press two keys (use two fingers) in the bottom row to activate the layer.
After some time I gave up. I just need a less minimalistic keyboard.
Lily58
Lily58 is another design very similar to (and partly based on) Corne. I haven’t built this keyboard but I was considering it could be the next step.

It is almost perfect:
- There’s one additional row at the top so I get back the number row.
F1-F12keys could use those on the symbol layer in the same way I have them on Katana60. - We have one additional key in the bottom row on each side. That’s almost perfect but having 2 would have been much better.
Lily58 would work nicely for me but I would have to either:
- Use workaround 1) from above. I changed my Katana60 layout and tried to use such setup for a few weeks hoping I could get used to it. But it was not getting better.
- Move layer switching to outer columns. But I like the idea of having those under my thumbs. I switch layers very often and that might put too much strain on my pinkies.
So let’s design a keyboard, why not?
Lily58 is almost perfect and also opensource with KiCad files available. So I decided to modify them and add the desired keys. I chose the Lily58 Pro version2 as the basis for my changes.
Originally I just forked the repository and wanted to add only the 2 keys, name the keyboard Lily60 or something like that and send the manufacture order for PCBs. But I got a bit carried away3 but I am going to describe that in another article. This one is about layouts, so let’s see how it would look (the whole layout can be also viewed at keyboard-layout-editor.com)
Default layer contains no surprises:
Cmd,Ctrl,Altare in the bottom layer on both sides.- Layer switching,
SpaceandEnterare in thumb cluster. Shiftkeys are placed traditionally.TabandEscare moved one row down so they are easier to access.
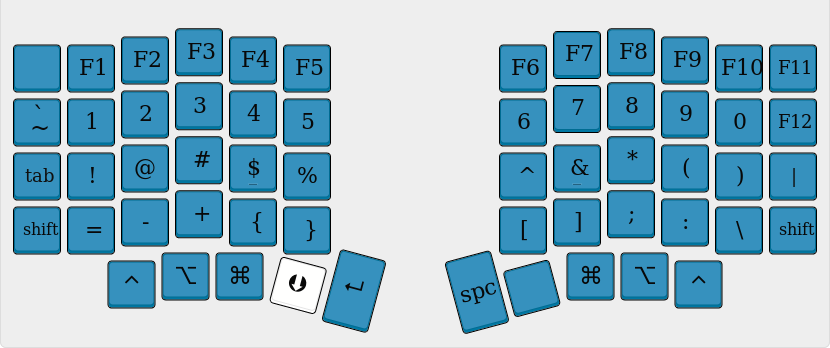
Symbol layer is very similar to Katana60 and that’s intentional - it would be easier to get used to.
- All
F1-F11buttons are in the top row and they are aligned to number keys (F1is where1is) - Only
F12is moved down. But that’s convenient since I use it to activate terminal and it’s nice to have it closer to my pinkie.
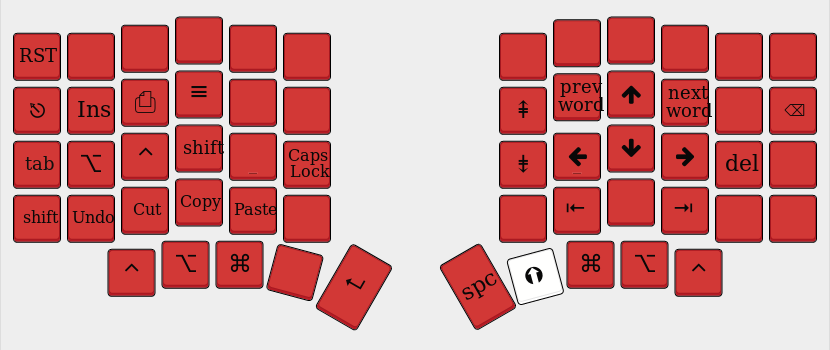
Extend layer is also almost the same as on Katana60 since it is already in my muscle memory.
- The right side contains arrows, jumping to the start/end of the line, next and previous word,
page upandpage down.Deleteis also included. - The left side contains modifiers for easier access when the layer is active (so I can combine them with movement keys).
- Also,
Caps Lockis here since it is sometimes handy. Not enough to be on the default layer, though. - And few shortcuts for
Undo,Copy,Paste,Cut. Again their purpose is to allow for easier editing of text without a need to leave the layer. - And keys I don’t use so often
Ins,Print Screen, andMenu(which I believe does nothing on Mac). RSTis a utility key to restart the micro-controller.
Testing the layout and building the keyboard
I am finishing the first revision of the keyboard PCB (KiCad files on github) but it will still take some time until I polish the design, order the manufacture and build the keyboard.
But I am already testing the new layout. I have modified my Katana60 layout4 and added two more configurations (one for Mac and one for Linux) with the layout I described above and I have been using it for a few weeks. It works quite well and I am getting used to the changes. Of course, it’s work in progress.
I am going to share more about the design of the keyboard in the next article, so if you are interested you can follow me on Twitter or use an old-school RSS feed and subscribe to updates on this blog.
Footnotes
-
Examples below show traditional QWERTY layout so the dear reader is not confused by COLEMAK. ↩
-
The Pro version uses hot-swap sockets (on Aliexpress) for keyboard switches. That would allow me to use nice (and expensive) switches and If I don’t like the board I would be able to use them on another one. Sockets are much cheaper than switches. ↩
-
I moved some keys in the bottom row and rotated them a bit. I also realized I don’t need the middle keys above the thumb keys but maybe I could add a rotary encoder which is also supported by QMK firmware and can be used to… well, to emit any keystrokes I would desire. And finally, I started moving things around the micro-controller. The resulting design is still very close to the Lily58 and most of the routing for keys is the same. But If I like where the board is going I am planning to do further improvements. One of them would be to integrate micro-controller directly on the board which would be a bit nicer than using Pro Micro boards. I would also like to use a USB-C connector and maybe figure out a better way how to connect the halves than audio cable. But that’s all for the future. ↩
-
The current layout can be found in my fork of QMK Firmware on Github, branch
split_training. Thekeymap.cfile contains all the layouts I have in my keyboard - there are more of them and I can switch between theme as I want. A bit more details about why I did it like that can be found in the original Katana60 article. ↩
This article is Part 1 in a 7-Part Series.
- Part 1 -In search of the best custom keyboard layout
- Part 2 -Let me introduce you SofleKeyboard - a split keyboard based on Lily58 and Crkbd
- Part 3 -SofleKeyboard build log/guide
- Part 4 -Sofle Keyboard evolution: slow and not really steady
- Part 5 -Another year of Sofle keyboard
- Part 6 -Stáňa AKA Sofle Unsplit - a monoblock split keyboard
- Part 7 -Stáňa - a monoblock split keyboard, part 2